Homemade Dark Fudge Ice Cream: A Decadent Delight Far Superior to Store-Bought
Are you tired of grocery store chocolate ice cream that promises richness but delivers a pale, vaguely chocolate-flavored experience? That watery, barely-brown stuff often leaves much to be desired, failing to satisfy the deep, dark chocolate cravings that truly call for a special treat. If your ideal scoop involves an intense, velvety, and profoundly fudgey sensation that melts divinely on your tongue, then it's time to discover the unparalleled joy of
homemade chocolate fudge ice cream. Forget those bland imitations; crafting this dessert at home elevates the experience to an art form, promising a rich, dark, and utterly amazing creation that will redefine your standards.
The journey to making your own ice cream might seem daunting, especially if you've only dabbled in the simpler, no-churn varieties. While no-churn options are certainly delicious and convenient, they often can't quite capture the sublime creaminess and texture achieved with a proper ice cream maker and a carefully prepared custard base. This article will guide you through the process of creating a truly decadent homemade chocolate fudge ice cream, proving that the effort is not only manageable but profoundly rewarding. Prepare to impress your taste buds and any lucky recipients of this magnificent dessert.
Why Homemade Chocolate Fudge Ice Cream Reigns Supreme
The difference between store-bought chocolate ice cream and a truly exceptional homemade version is like night and day. Mass-produced ice creams often prioritize shelf stability and cost-efficiency, resulting in a product that frequently cuts corners on genuine flavor and texture. They might use cocoa powder without the depth of real dark chocolate, rely on artificial flavorings, or incorporate excessive air, leading to a less dense and less satisfying scoop.
Homemade chocolate fudge ice cream, on the other hand, allows for an uncompromising approach to quality. You control every ingredient, from the intensity of the cocoa to the percentage of dark chocolate chips, ensuring a robust, authentic chocolate flavor that permeates every single bite. The inclusion of egg yolks in the base creates a luscious, almost pudding-like custard that translates into an incredibly creamy, smooth, and dense ice cream, devoid of the icy crystals that can plague lesser versions.
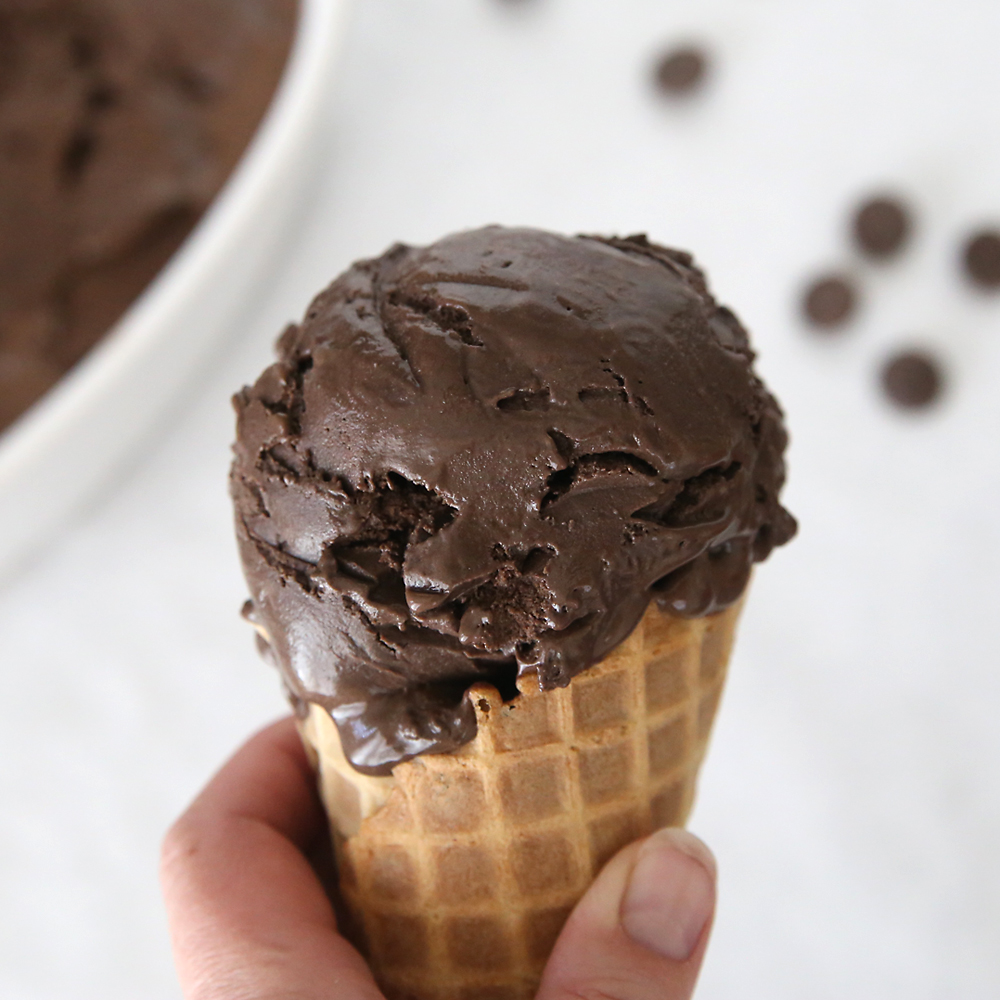
This isn't just chocolate ice cream; it's *fudge* ice cream. This distinction means an even deeper, more concentrated chocolate essence, bordering on the intensity of a melted fudge brownie. It’s a sensory experience – the sight of its rich, dark hue, the subtle aroma of pure cocoa, the velvety texture that coats your palate, and the profound, lingering taste of genuine chocolate. When you scoop out a portion of this homemade delight, you'll immediately notice the difference in its density and the way it resists melting into a puddle, holding its form beautifully thanks to its rich composition. It’s an indulgence that genuinely feels like a reward, a testament to the magic that happens when quality ingredients meet a little bit of kitchen love.
The Craft of Creating Decadent Homemade Chocolate Fudge Ice Cream
Crafting this sensational
homemade chocolate fudge ice cream involves a few distinct steps, but rest assured, none are overly complicated. The key is planning ahead, as the base requires significant chilling time to achieve its optimal texture. Think of it as a culinary adventure that yields unparalleled rewards.
Essential Ingredients for Unforgettable Flavor
The secret to this ice cream's incredible depth and creaminess lies in its carefully selected components. Each ingredient plays a vital role in building its complex flavor profile and luxurious texture.
*
1 cup Whipping Cream: This is the foundation of richness, contributing to the ice cream's creamy mouthfeel and preventing iciness.
*
2 cups 2% Milk (divided): Provides liquid volume and balances the richness of the cream, ensuring the ice cream isn't overly heavy.
*
4 tablespoons Unsweetened Baking Cocoa (heaping): The cornerstone of our dark chocolate flavor. Using a *heaping* amount ensures an intense, robust cocoa presence, far from the 'barely brown' stuff.
*
6 oz (1 cup) 60% or darker chocolate chips: Layers of quality dark chocolate chips melt into the base, adding further depth and a true fudge-like character. Opting for 60% or higher ensures a sophisticated, less sweet chocolate profile.
*
1/2 cup Sugar: Sweetens the ice cream but also contributes to its smooth texture by lowering the freezing point, helping to prevent ice crystals.
*
1/2 teaspoon Salt: A crucial, often overlooked ingredient! Salt doesn't just season; it magnificently enhances the chocolate flavor, making it pop and balancing the sweetness.
*
5 Egg Yolks: The magic behind the super-creamy, custard-like consistency. Egg yolks emulsify the fats and liquids, creating a rich, velvety texture that is the hallmark of premium ice cream. This is what truly sets machine-churned ice cream apart from no-churn varieties.
*
1/2 teaspoon Vanilla: A classic flavor enhancer that complements and deepens the chocolate notes.
The Step-by-Step Journey to Fudgey Perfection
While the process involves a few stages, each step is straightforward. For visual learners, remember that many home cooks find video demonstrations incredibly helpful in removing any guesswork from the process.
1.
Begin the Chocolate Base: In a medium saucepan, combine the whipping cream and unsweetened baking cocoa. Whisk continuously over medium heat until thoroughly combined and the edges just begin to bubble. Remove from heat immediately.
2.
Melt and Mix: Add the dark chocolate chips to the hot cream and cocoa mixture. Let them sit for a few minutes to soften, then stir vigorously until the chocolate is completely melted and the mixture is smooth and glossy. Whisk in one cup of the 2% milk. Pour this rich chocolate mixture into a large bowl and set aside.
3.
Prepare the Custard Base: In a separate medium saucepan, heat the remaining cup of 2% milk, sugar, and salt over medium heat, stirring until the sugar and salt are dissolved. While this mixture gently heats, separate your eggs, reserving the yolks and discarding the whites (or save them for another recipe!). Whisk the egg yolks in a separate small bowl.
4.
Temper the Eggs: This step is critical for a smooth custard. Slowly pour a small amount of the warm milk mixture into the whisked egg yolks, whisking constantly to gradually bring the yolks up to temperature without scrambling them. Once tempered, pour the egg yolk mixture back into the pot with the warm milk, whisking well to combine.
5.
Thicken the Custard: Continue heating the milk and egg mixture over medium heat, stirring constantly, until it thickens enough to coat the back of a metal spoon. Do not boil. Once thickened, remove from heat.
6.
Combine & Chill: Pour the hot milk and egg custard mixture over the prepared chocolate mixture in the large bowl. Add the vanilla extract and stir until everything is completely combined and smooth. Cover the bowl and refrigerate for 5-6 hours, or ideally overnight, until the mixture is thoroughly chilled. This extended chilling time is vital for developing flavor and achieving the creamiest texture during churning.
7.
Churning Perfection: Once the base is perfectly chilled, pour it into your ice cream maker and freeze according to the manufacturer's instructions. This recipe typically yields about 1.5 quarts, perfect for most smaller countertop machines that don't require ice. If you have a larger, standard ice cream maker that uses ice and salt, consider doubling the recipe.
8.
Serve or Harden: You can enjoy the ice cream directly from the machine; it will have a delightful soft-serve consistency. For a firmer, scoopable ice cream, transfer it to an airtight container and freeze for another 1-2 hours.
Tips for Mastering Your Homemade Chocolate Fudge Ice Cream
To truly elevate your
homemade chocolate fudge ice cream, consider these expert tips and insights:
*
Plan Ahead is Key: The 5-6 hour (or longer) chilling time for the base is non-negotiable for optimal texture. Don't rush it! A well-chilled base freezes faster and prevents ice crystal formation.
*
Invest in Quality Ingredients: The difference between mediocre and magnificent ice cream often comes down to the quality of your cocoa powder and dark chocolate. Opt for a reputable brand of unsweetened baking cocoa and high-quality dark chocolate chips (60% cacao or higher) for the richest flavor.
*
Know Your Machine: Familiarize yourself with your ice cream maker's specific instructions. Some require pre-freezing the bowl, others use ice and salt. Knowing your equipment ensures a smooth churning process.
*
Creative Customizations: While this recipe is perfect as is, feel free to experiment!
*
Add-ins: Swirl in extra fudge sauce, sprinkle in chocolate chunks, toasted nuts (pecans, walnuts), or even a touch of espresso powder to deepen the chocolate flavor.
*
Spice it Up: A tiny pinch of cayenne pepper can add a surprising, warming kick, enhancing the chocolate's complexity.
*
Flavor Boost: A tablespoon of your favorite coffee liqueur can also heighten the chocolate notes.
*
Storing Your Creation: Store your homemade ice cream in an airtight container to prevent freezer burn. A shallow, wide container is often better than a deep one for even freezing. If it becomes too hard, let it sit at room temperature for 5-10 minutes before scooping.
*
Troubleshooting Icy Ice Cream: If your ice cream turns out icy, it's often due to insufficient fat (not enough cream/yolks), too much water (ensure proper measurements), or insufficient chilling of the base before churning. The custard method with egg yolks largely mitigates this issue.
Serving this luxurious creation is a joy in itself. Enjoy it simply on its own, allowing the pure, unadulterated chocolate flavor to shine. Or, elevate it with a dollop of fresh whipped cream, a scattering of fresh berries, or an additional drizzle of rich chocolate sauce.
In the end, the experience of creating and savoring this magnificent
Indulge in Rich, Dark Homemade Chocolate Fudge Ice Cream is deeply rewarding. It’s more than just a dessert; it’s an act of culinary love and a testament to the fact that the best things often come from your own kitchen. This
Authentic Homemade Dark Chocolate Fudge Ice Cream Recipe will undoubtedly become a staple in your dessert repertoire, forever changing your perception of what chocolate ice cream can be. So, gather your ingredients, fire up your ice cream maker, and prepare for a truly unforgettable, better-than-store-bought indulgence!